VUPPMGR40v2 kit (40 Led PPM/VU/GR Meter kit) BUILD THREAD
Posted: Wed Jun 02, 2010 3:26 pm
OLD Ver 2 kit not for new builds
Available now on JLM web shop here
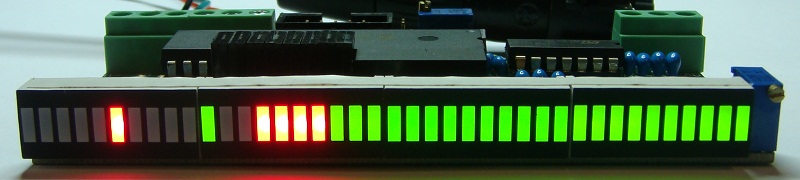
40 Led Meter displays PPM and VU ballistics with peak hold at the same time. Also can be switched to show CV gain reduction.
•40 x 1dB steps
•Shows PPM in red with peak hold.
•Shows VU in Green with peak hold.
•Balanced/Unbalanced input with front level adjustment.
•PCB 106mm(4.2") x 50.4mm(2")
•PCBs can be stacked 15mm apart with hex threaded spacers.
•Can be powered from +/-12vdc to +/-24vdc (less than 50mA total current draw all leds lit).
•Can have on board tiny 24vdc to 5vdc SMPS or +5v can be supplied externally.
Software version 1.0
SW terminal switched to 0v to switch to CV input for input on back terminals for Gain reduction.
IDC header which can daisy chained to other 40 led PPM/VU/GR PCBs
1.Jumper for switching to CV input. (Linked to SW terminal)
2.Jumper for Peak hold lock with reset when jumper shorted. If jumper left on then defaults to peak hold with decay drop back.
3.Jumper for turn off VU peak hold.
4.Jumper for direction change of meter right to left / Left to right
5.Jumper for CV voltage change from 0v to 5v to 5v to 0v. (CV input must be driven by 1k to 2k series resistor to protect the PIC)
(All jumpers can be switched or changed on the fly)(Jumper 1 is closest to the SW terminal)
e.g You can switch direction and to CV input to have a Gain reduction meter that travels in the reverse direction to the VUPPM meter.

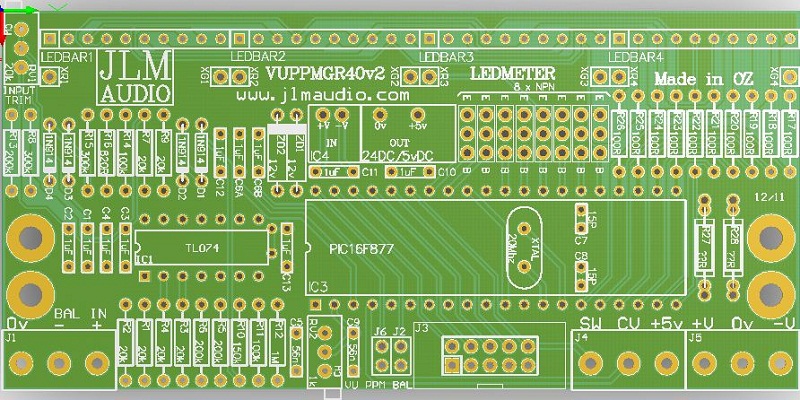
VUPPM Assembly
The VUPPM has all parts values on the PCB overlay and is a normal build from the lowest to tallest height component.
Only component changes that need to be done depending on power supply voltages are listed in the table below. So usually best to work out these parts and fit them first. Also a good idea to fit all resistor to the PCB beofre soldering them to make sure you do not put one in the wrong place. For those not good with colour codes bend the legs of the resistor ready for the PCB and place them into a ohmmeter terminals (without any test leads) to check the resistor value before placing in the PCB.
The 4 Tri colour 10 LED Bars need to have the 10 legs bent down 90degree which can be done with a flat metal ruler etc so they all bend in a straight line. Top 2 legs need to be bent 60degrees so they will reach into the XG & XR pads. Best to only solder one of the bottom legs on each display until you have the 4 bars fitted in a straight line.
The 8 x BD139 transistors all face with their plastic side facing the JLM AUDIO logo end of the PCB. So do pin 1 of the TL074 and PIC CPU IC.
Diodes black or white stripes should line up with the thicker white stripe on the PCB overlay. All 1N914/1N4148 diodes stripes should be furthermost away from the LED displays and Zener diodes stripes if fitted should be closest to the LED Displays.
Any questions feel free to post here preferably or email me.
NEW VUPPMGR40v2 PCB Changes
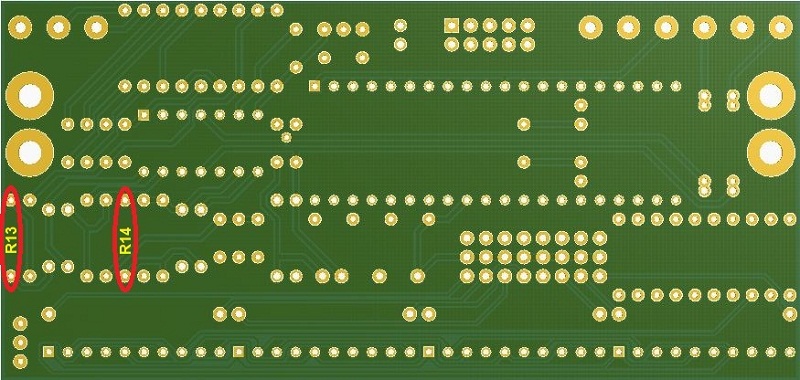
R13 & R14 no longer need to be changed at all. (Instead R15 has been changed from 200k to 300k and R16 has been changed from 560R to 820R. C6c deleted). C12 moved. and VR2 VU PPM balance trim pot turned 90 degree.
J6 added. Jumper fitted to J6 normal PPM release time 650mS like version 1. Jumper J6 removed for shorter PPM release time of 350mS. J2 jumper is still not used.
R13 & R14 changes only for ver 1 PCB are to give more headroom the the TL074 when running them at +/-12v (so when either ZD1 & ZD2 are 12v zeners or when running +/-12v into VUPPM terminals). It was found that the top 4 leds sometimes will not track as they should due to the TL074 approaching clipping at about +/-10.5vac. For all new builds I recommend fitting for any power rail voltages R13 = 150k and R14 = 75k which are now supplied in the kit. And all existing builds on +/12v add a second 200k resistor under the PCB across R13 to make R13 = 100k and a second 100k resistor under the PCB across R14 to make R14 = 50k. After changes to R13 & R14 the VU balance trim pot will have to be readjust upwards to match the PPM level with a 1k tone.
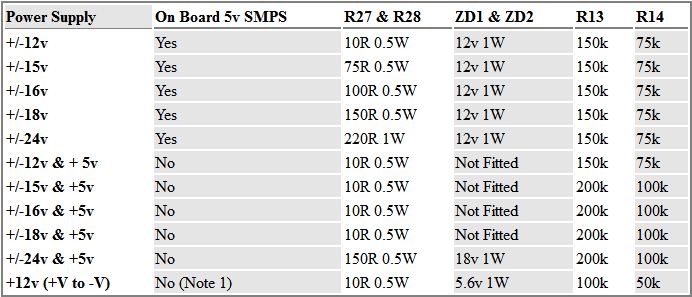
Note 1 The VUPPM can be made to run on 12v only with changes shown and a 1N4007 diode instead of 5v smps. Diode is mounted between 5v smps pin 1 Anode to pin 4 Cathode to supply 5v to PIC. The 1uF caps next to the smps may need to be changed to 100uF 25v electros if the 12v is coming from a noisy power source like a car.
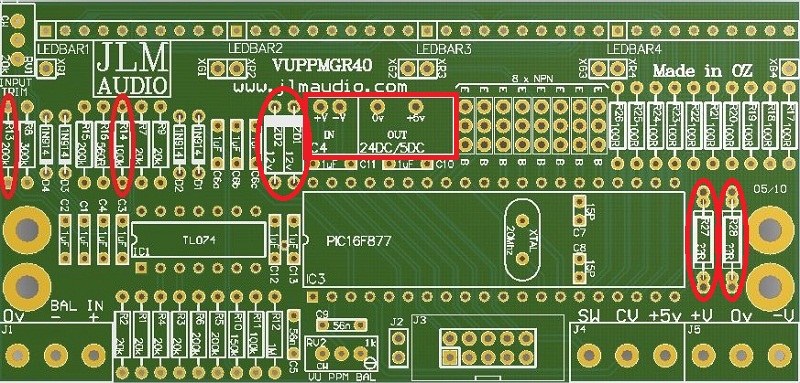
Parts mentioned in above table shown in red outline.
Have a stereo compact box and scale coming as well as a 1unit rack case scale. Looking for input on what other scale levels or types people are interested in like mono, 0DFS etc
Stereo compact box will have a optional pre made stereo D/A card for spdif and toslink inputs.
See scale examples below
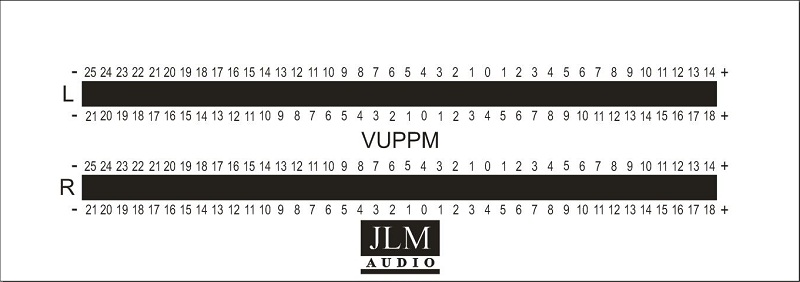
Scale panel size 128mm (5.039") x 45mm (1.772") and fits Hammond Enclosure 1598B.
Rack version below
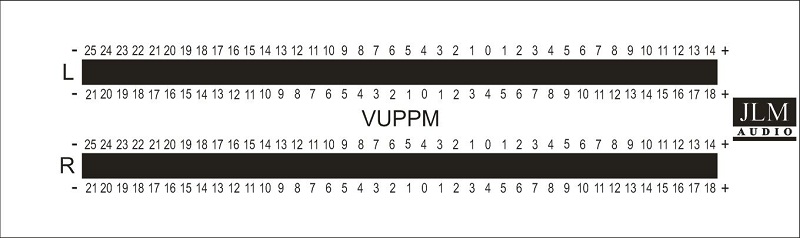
Scale panel size 128mm (5.039") x 38mm (1.496")
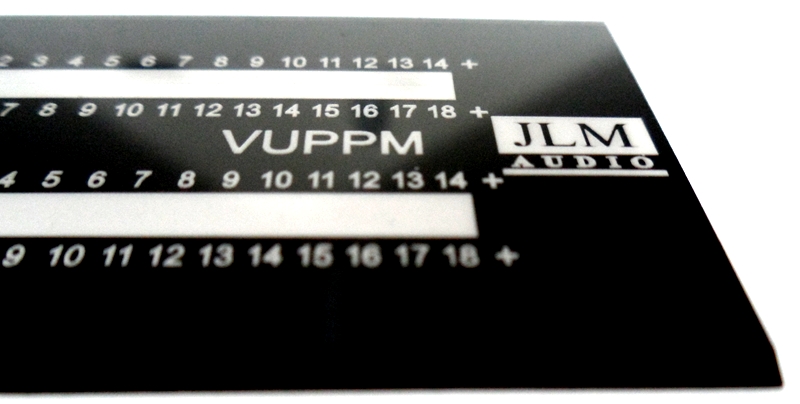
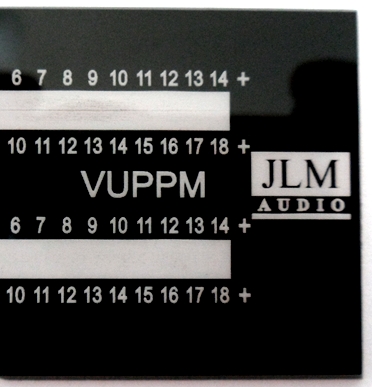
Photos of VUPPM Scale rack sample in 2mm clear perspex with black backing with laser cut text and bevelled edge.

 com/VUPPM/VUPPM%20Scale%20Sample2
Available now on JLM web shop here
40 Led Meter displays PPM and VU ballistics with peak hold at the same time. Also can be switched to show CV gain reduction.
•40 x 1dB steps
•Shows PPM in red with peak hold.
•Shows VU in Green with peak hold.
•Balanced/Unbalanced input with front level adjustment.
•PCB 106mm(4.2") x 50.4mm(2")
•PCBs can be stacked 15mm apart with hex threaded spacers.
•Can be powered from +/-12vdc to +/-24vdc (less than 50mA total current draw all leds lit).
•Can have on board tiny 24vdc to 5vdc SMPS or +5v can be supplied externally.
Software version 1.0
SW terminal switched to 0v to switch to CV input for input on back terminals for Gain reduction.
IDC header which can daisy chained to other 40 led PPM/VU/GR PCBs
1.Jumper for switching to CV input. (Linked to SW terminal)
2.Jumper for Peak hold lock with reset when jumper shorted. If jumper left on then defaults to peak hold with decay drop back.
3.Jumper for turn off VU peak hold.
4.Jumper for direction change of meter right to left / Left to right
5.Jumper for CV voltage change from 0v to 5v to 5v to 0v. (CV input must be driven by 1k to 2k series resistor to protect the PIC)
(All jumpers can be switched or changed on the fly)(Jumper 1 is closest to the SW terminal)
e.g You can switch direction and to CV input to have a Gain reduction meter that travels in the reverse direction to the VUPPM meter.
VUPPM Assembly
The VUPPM has all parts values on the PCB overlay and is a normal build from the lowest to tallest height component.
Only component changes that need to be done depending on power supply voltages are listed in the table below. So usually best to work out these parts and fit them first. Also a good idea to fit all resistor to the PCB beofre soldering them to make sure you do not put one in the wrong place. For those not good with colour codes bend the legs of the resistor ready for the PCB and place them into a ohmmeter terminals (without any test leads) to check the resistor value before placing in the PCB.
The 4 Tri colour 10 LED Bars need to have the 10 legs bent down 90degree which can be done with a flat metal ruler etc so they all bend in a straight line. Top 2 legs need to be bent 60degrees so they will reach into the XG & XR pads. Best to only solder one of the bottom legs on each display until you have the 4 bars fitted in a straight line.
The 8 x BD139 transistors all face with their plastic side facing the JLM AUDIO logo end of the PCB. So do pin 1 of the TL074 and PIC CPU IC.
Diodes black or white stripes should line up with the thicker white stripe on the PCB overlay. All 1N914/1N4148 diodes stripes should be furthermost away from the LED displays and Zener diodes stripes if fitted should be closest to the LED Displays.
Any questions feel free to post here preferably or email me.
NEW VUPPMGR40v2 PCB Changes
R13 & R14 no longer need to be changed at all. (Instead R15 has been changed from 200k to 300k and R16 has been changed from 560R to 820R. C6c deleted). C12 moved. and VR2 VU PPM balance trim pot turned 90 degree.
J6 added. Jumper fitted to J6 normal PPM release time 650mS like version 1. Jumper J6 removed for shorter PPM release time of 350mS. J2 jumper is still not used.
R13 & R14 changes only for ver 1 PCB are to give more headroom the the TL074 when running them at +/-12v (so when either ZD1 & ZD2 are 12v zeners or when running +/-12v into VUPPM terminals). It was found that the top 4 leds sometimes will not track as they should due to the TL074 approaching clipping at about +/-10.5vac. For all new builds I recommend fitting for any power rail voltages R13 = 150k and R14 = 75k which are now supplied in the kit. And all existing builds on +/12v add a second 200k resistor under the PCB across R13 to make R13 = 100k and a second 100k resistor under the PCB across R14 to make R14 = 50k. After changes to R13 & R14 the VU balance trim pot will have to be readjust upwards to match the PPM level with a 1k tone.
Note 1 The VUPPM can be made to run on 12v only with changes shown and a 1N4007 diode instead of 5v smps. Diode is mounted between 5v smps pin 1 Anode to pin 4 Cathode to supply 5v to PIC. The 1uF caps next to the smps may need to be changed to 100uF 25v electros if the 12v is coming from a noisy power source like a car.
Parts mentioned in above table shown in red outline.
Have a stereo compact box and scale coming as well as a 1unit rack case scale. Looking for input on what other scale levels or types people are interested in like mono, 0DFS etc
Stereo compact box will have a optional pre made stereo D/A card for spdif and toslink inputs.
See scale examples below
Scale panel size 128mm (5.039") x 45mm (1.772") and fits Hammond Enclosure 1598B.
Rack version below
Scale panel size 128mm (5.039") x 38mm (1.496")
Photos of VUPPM Scale rack sample in 2mm clear perspex with black backing with laser cut text and bevelled edge.
com/VUPPM/VUPPM%20Scale%20Sample2